
New PB Laptime!, but at What Cost?
As usual with this site… sometimes I feel I bit off more than I can chew. My updates are becoming almost even less frequent. Life has a way of speeding up for me this year. Buying a house, building a shop, a regular full time job (with night-schooling), and oh yeah… a newborn daughter in the house have all made their way as priorities in my life, and rightfully so. But, my very understandable wife still lets me wrench almost every day, and sometimes I even squeeze in enough time to update this blog for you all.
So, way back in early July I had finally gotten the car driveable and it felt very good. So why not screw it all up with a track day?
Cue up another Speed Syndicate/Revscene day at The Ridge Motorsports Park in Shelton, WA.
I showed up, unpacked (thanks to having my trunk back), went through tech, and got ready for my first session out.

I was very nervous about the track day. I had just gotten the car running a driving a week before. It felt good on the street, but had I tested it enough on the track? We’re about to find out.
Right out of the pits the car felt fantastic. It was literally screaming on every straight. Lots of people were drawn to the noise too… as I could see people hanging over the pit wall watching me go by the start/finish every lap. Before I knew it, I saw an beautiful RWB Porsche behind me. I upped the pace, and he kept up with me.

After a few very fun laps, I let the RWB by. I love following other mid/rear engined cars on track and seeing what their line choices are. I kept pace with him the remaining laps of the session. My lap timer (iphone) actually fell into the passenger footwell half way through the session… so I was unaware of how fast we were lapping.
When I got out of the car after that session the RWB owner came over and we had a great time chatting about the session. Turns out he’s a VERY nice guy, and very down to earth. Thanks for the fun Bong, hope we lap again on track next season!

When I finally checked my lap timer app… I was blown away to see a few of my laps were in the 1:57s, and one was a 1:57.1. Yup, the 2gr had shaved me a full 2 seconds! Crazy how much easier the car is to drive with the low end torque.

Throughout the morning sessions I kept lapping and having a great time. I had a friend who came down with me, so he rode with me most of the sessions. With the added weight I wasn’t really trying for new PRs, just enjoying the car and figuring out the different shift points with the newfound powerband and higher rev limit. We did notice however my hood was starting to come up above 80mph. When I did the Lotus vent mod, I had added hood pins at the farthest corners, so I thought I was ok to delete the OEM hood latch and save a couple pounds. Turns out I was wrong!

Seeing some of these pictures, I’m surprised the hood didn’t explode on me! I’m also not surprised I was bending the hood pins.
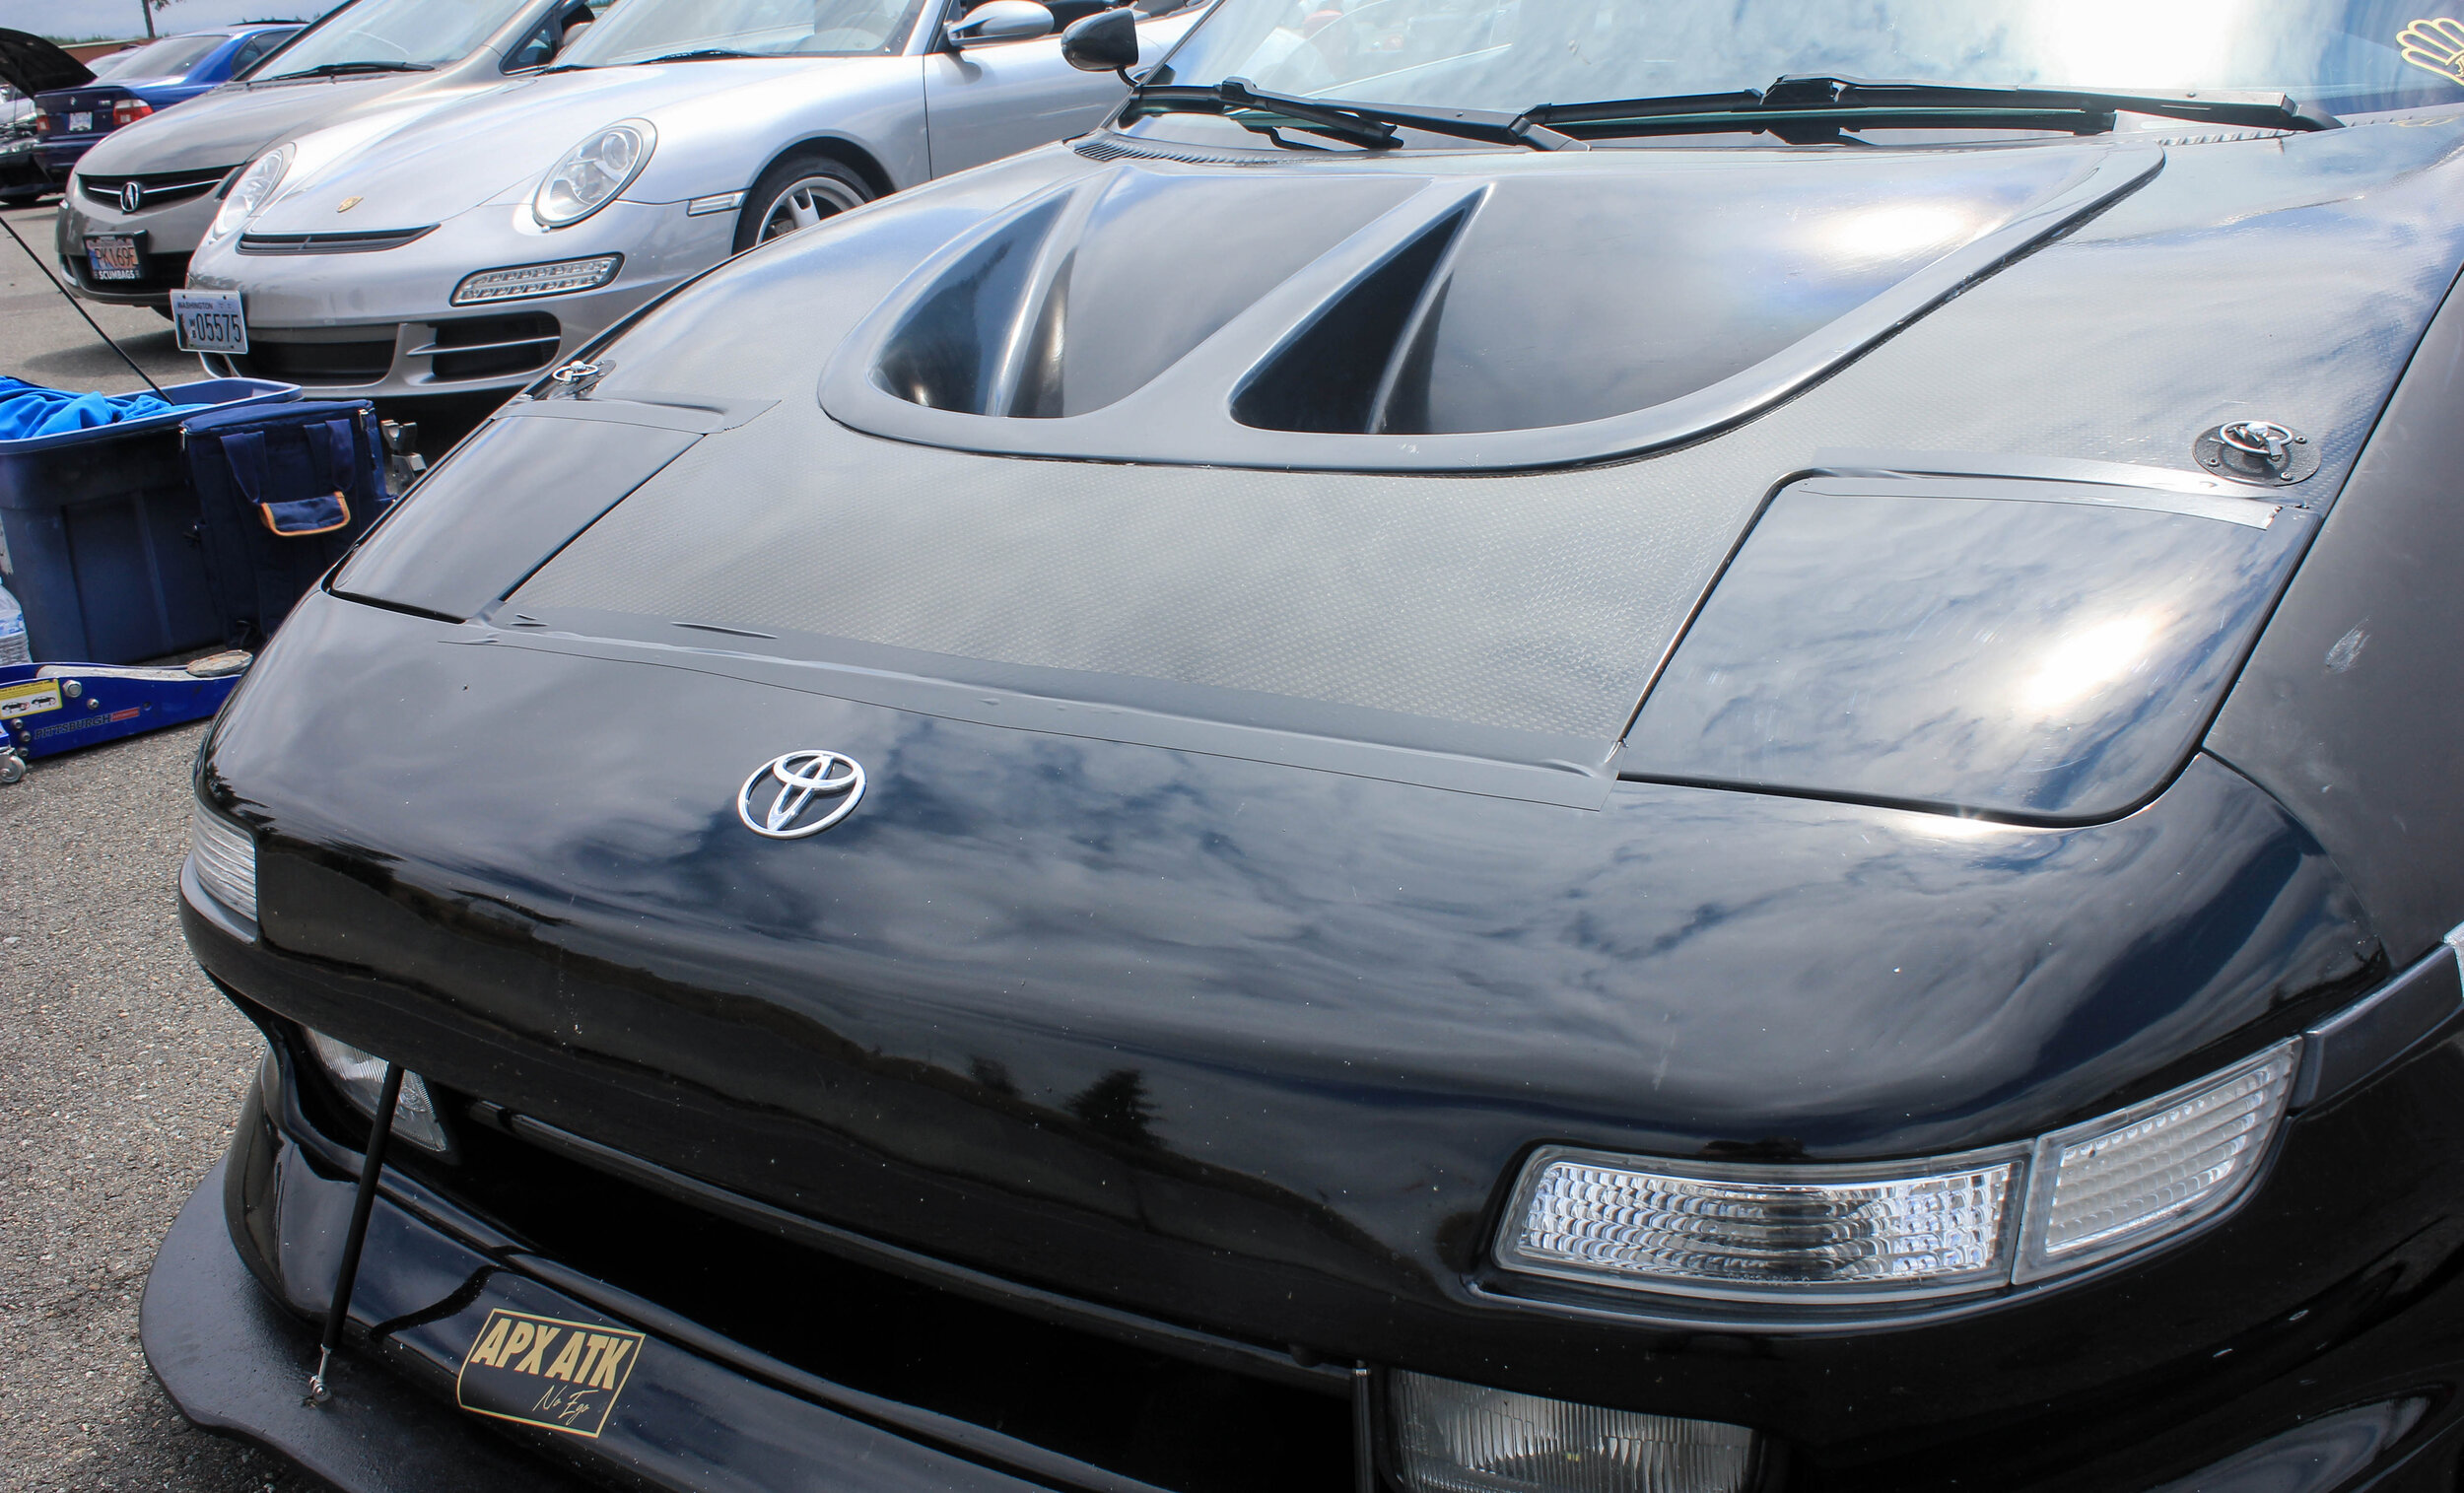
The solution, as always, is duct tape. Well, in this case, I have some fancy 3m neoprene tape I get through work (think of it as mega thick electrical tape).

Between sessions, that car looking cool as ever hard parked. During the lunch break I took my normal stroll around the paddock and grabbed some pics of the more interesting cars there.

There’s tons of civics at these events, I just really like the stance on this one, it really looks lowkey aggressive. The Volks and polycarbonate windows show how serious it is.

Who doesn’t love a full race-spec GT3 911? I’ve probably had this car on previous posts… the Martini livery just gets me.
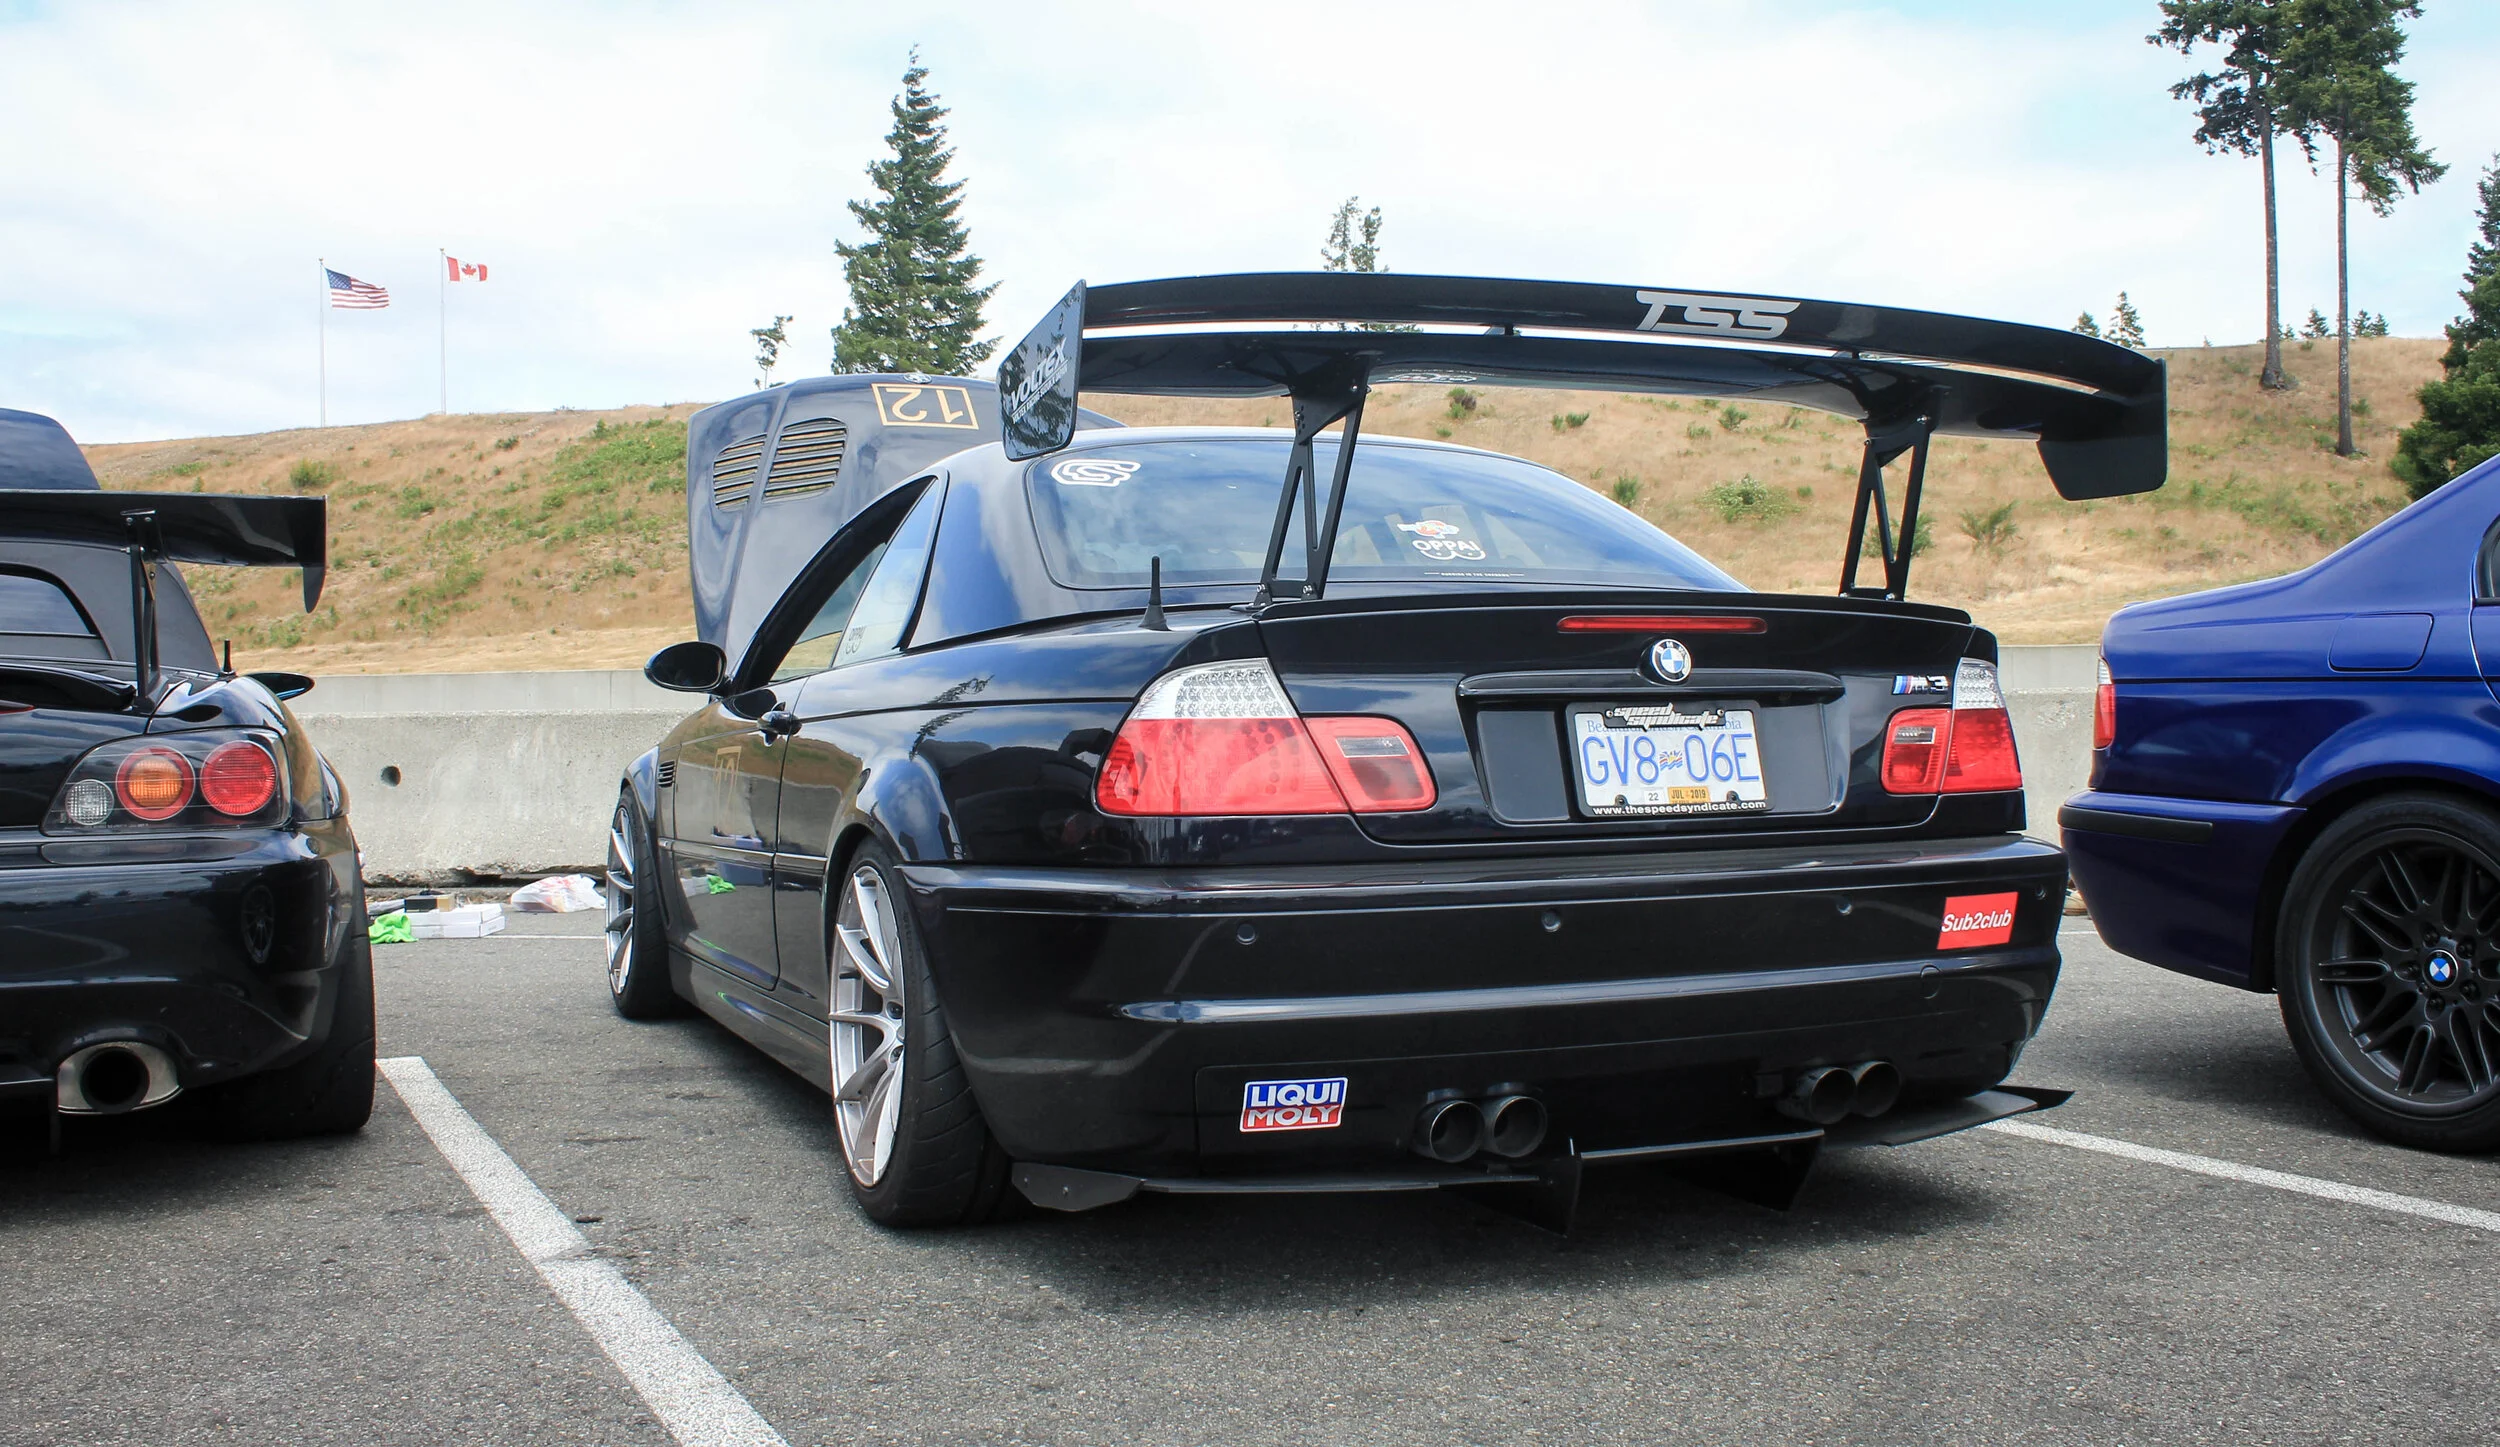
This M3 is also very clean. Now that I’m a BMW owner… M3s just rule, especially e46s.
Of course I had to check out Bong’s RWB more. If you can’t get enough here, his IG is rwb_bong. I love that he actually drives the crap out of his car. We were very close in pace on the track, which is awesome. Other than the kit and basic upgrades, the car is mostly stock. That’s right, a measily 260ish hp. The 315mm R888r rears do help with lateral grip though. He would usually hold his speed in the corners much better, and then I would catch him on the straights.


The custom built and spec’ed Work Meisters are amazing. No spacers here, just 11” fronts and 13” rears (I think). Notice the residual rubber on the rear flare…. love the track day character.

Pretty spartan interior, signed by Nakai San when he built the car a few years ago.

After lunch, I went out for some afternoon sessions.
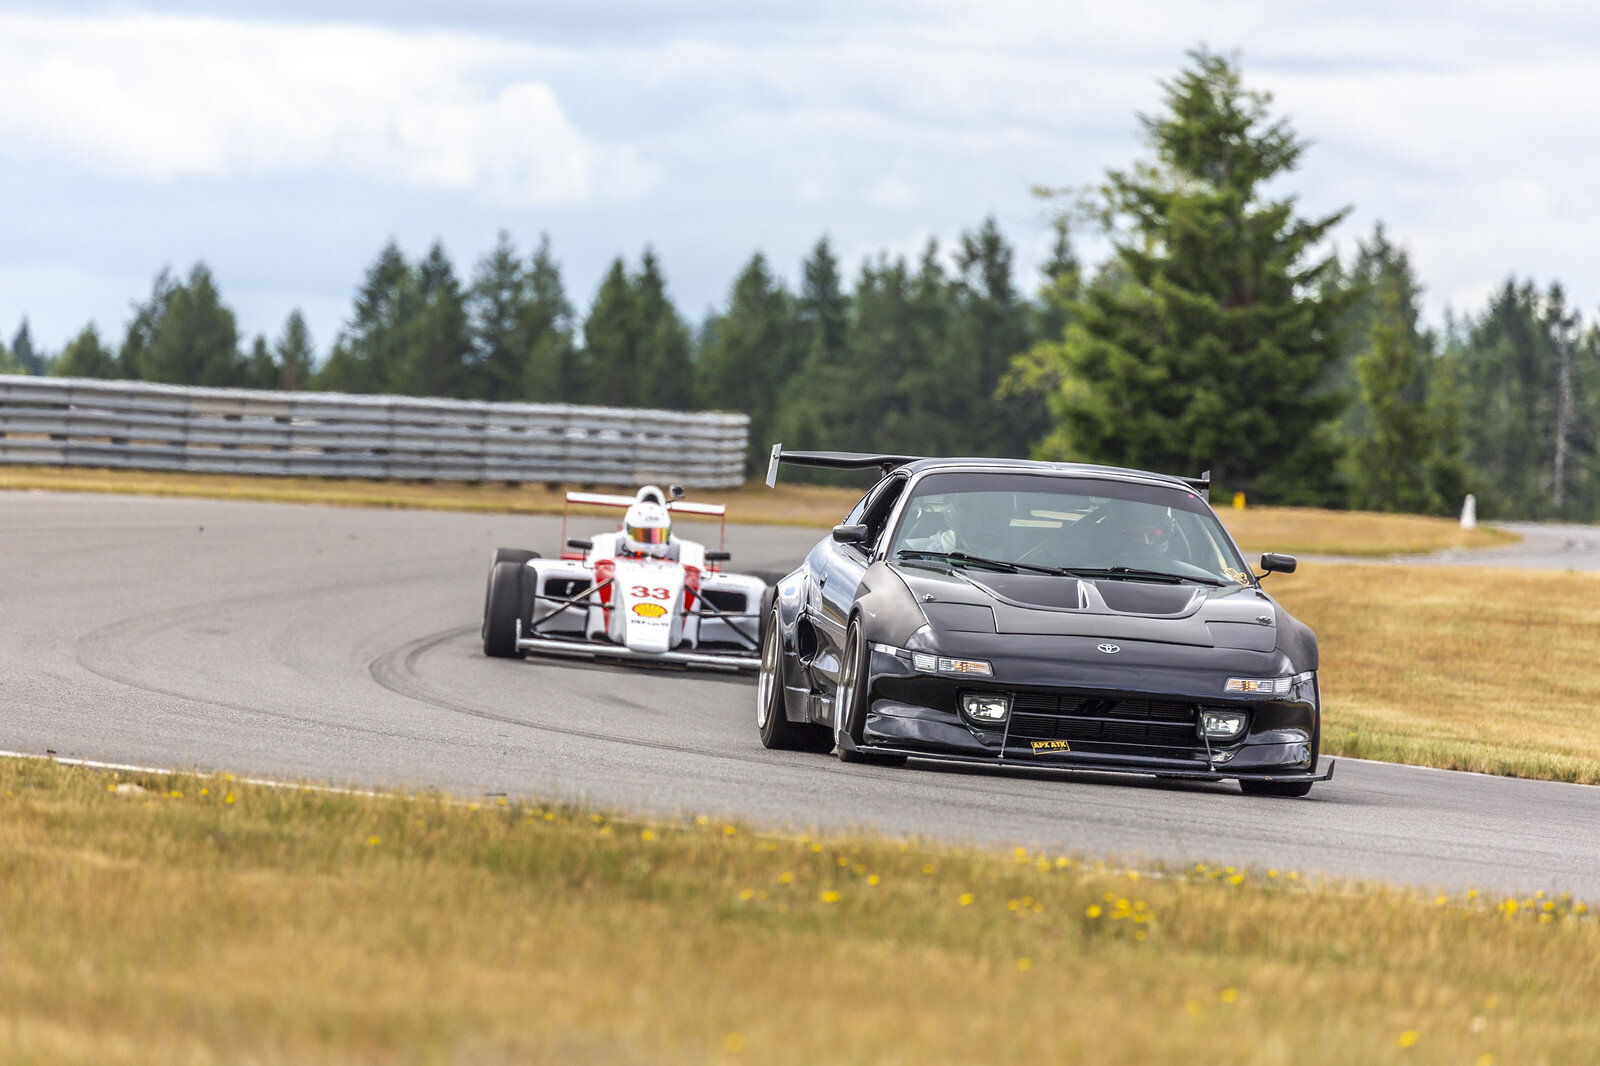
The owner of the shop putting on the track day sold his old Radical and picked up a Formula 4 car recently. He took it out one session and I got one of the coolest pictures I’ve ever had of my car. This is courtesy of James Craig, ig: touge.tough. Needless to say the Formula 4 passed me shortly after this snap.
James also sent me over this awesome clip of my car coming out of turn 11. Screaming.
You can also see my hood flapping a little bit before making the turn.

With the hood taped down the new front aero really started to feel effective. My top end speed all of the sudden felt a solid 5+ mph faster, and front end grip felt much more stable. With my buddy in the car we were having a really good session, and I was in the zone mentally, pushing the car harder and harder into each corner. Then, disaster struck for a second time. With a big audible BANG! my engine lid had once again popped free and destroyed itself along with my wing and trunk lid. If you look at the above pic, you can see the engine lid trying to lift on me…
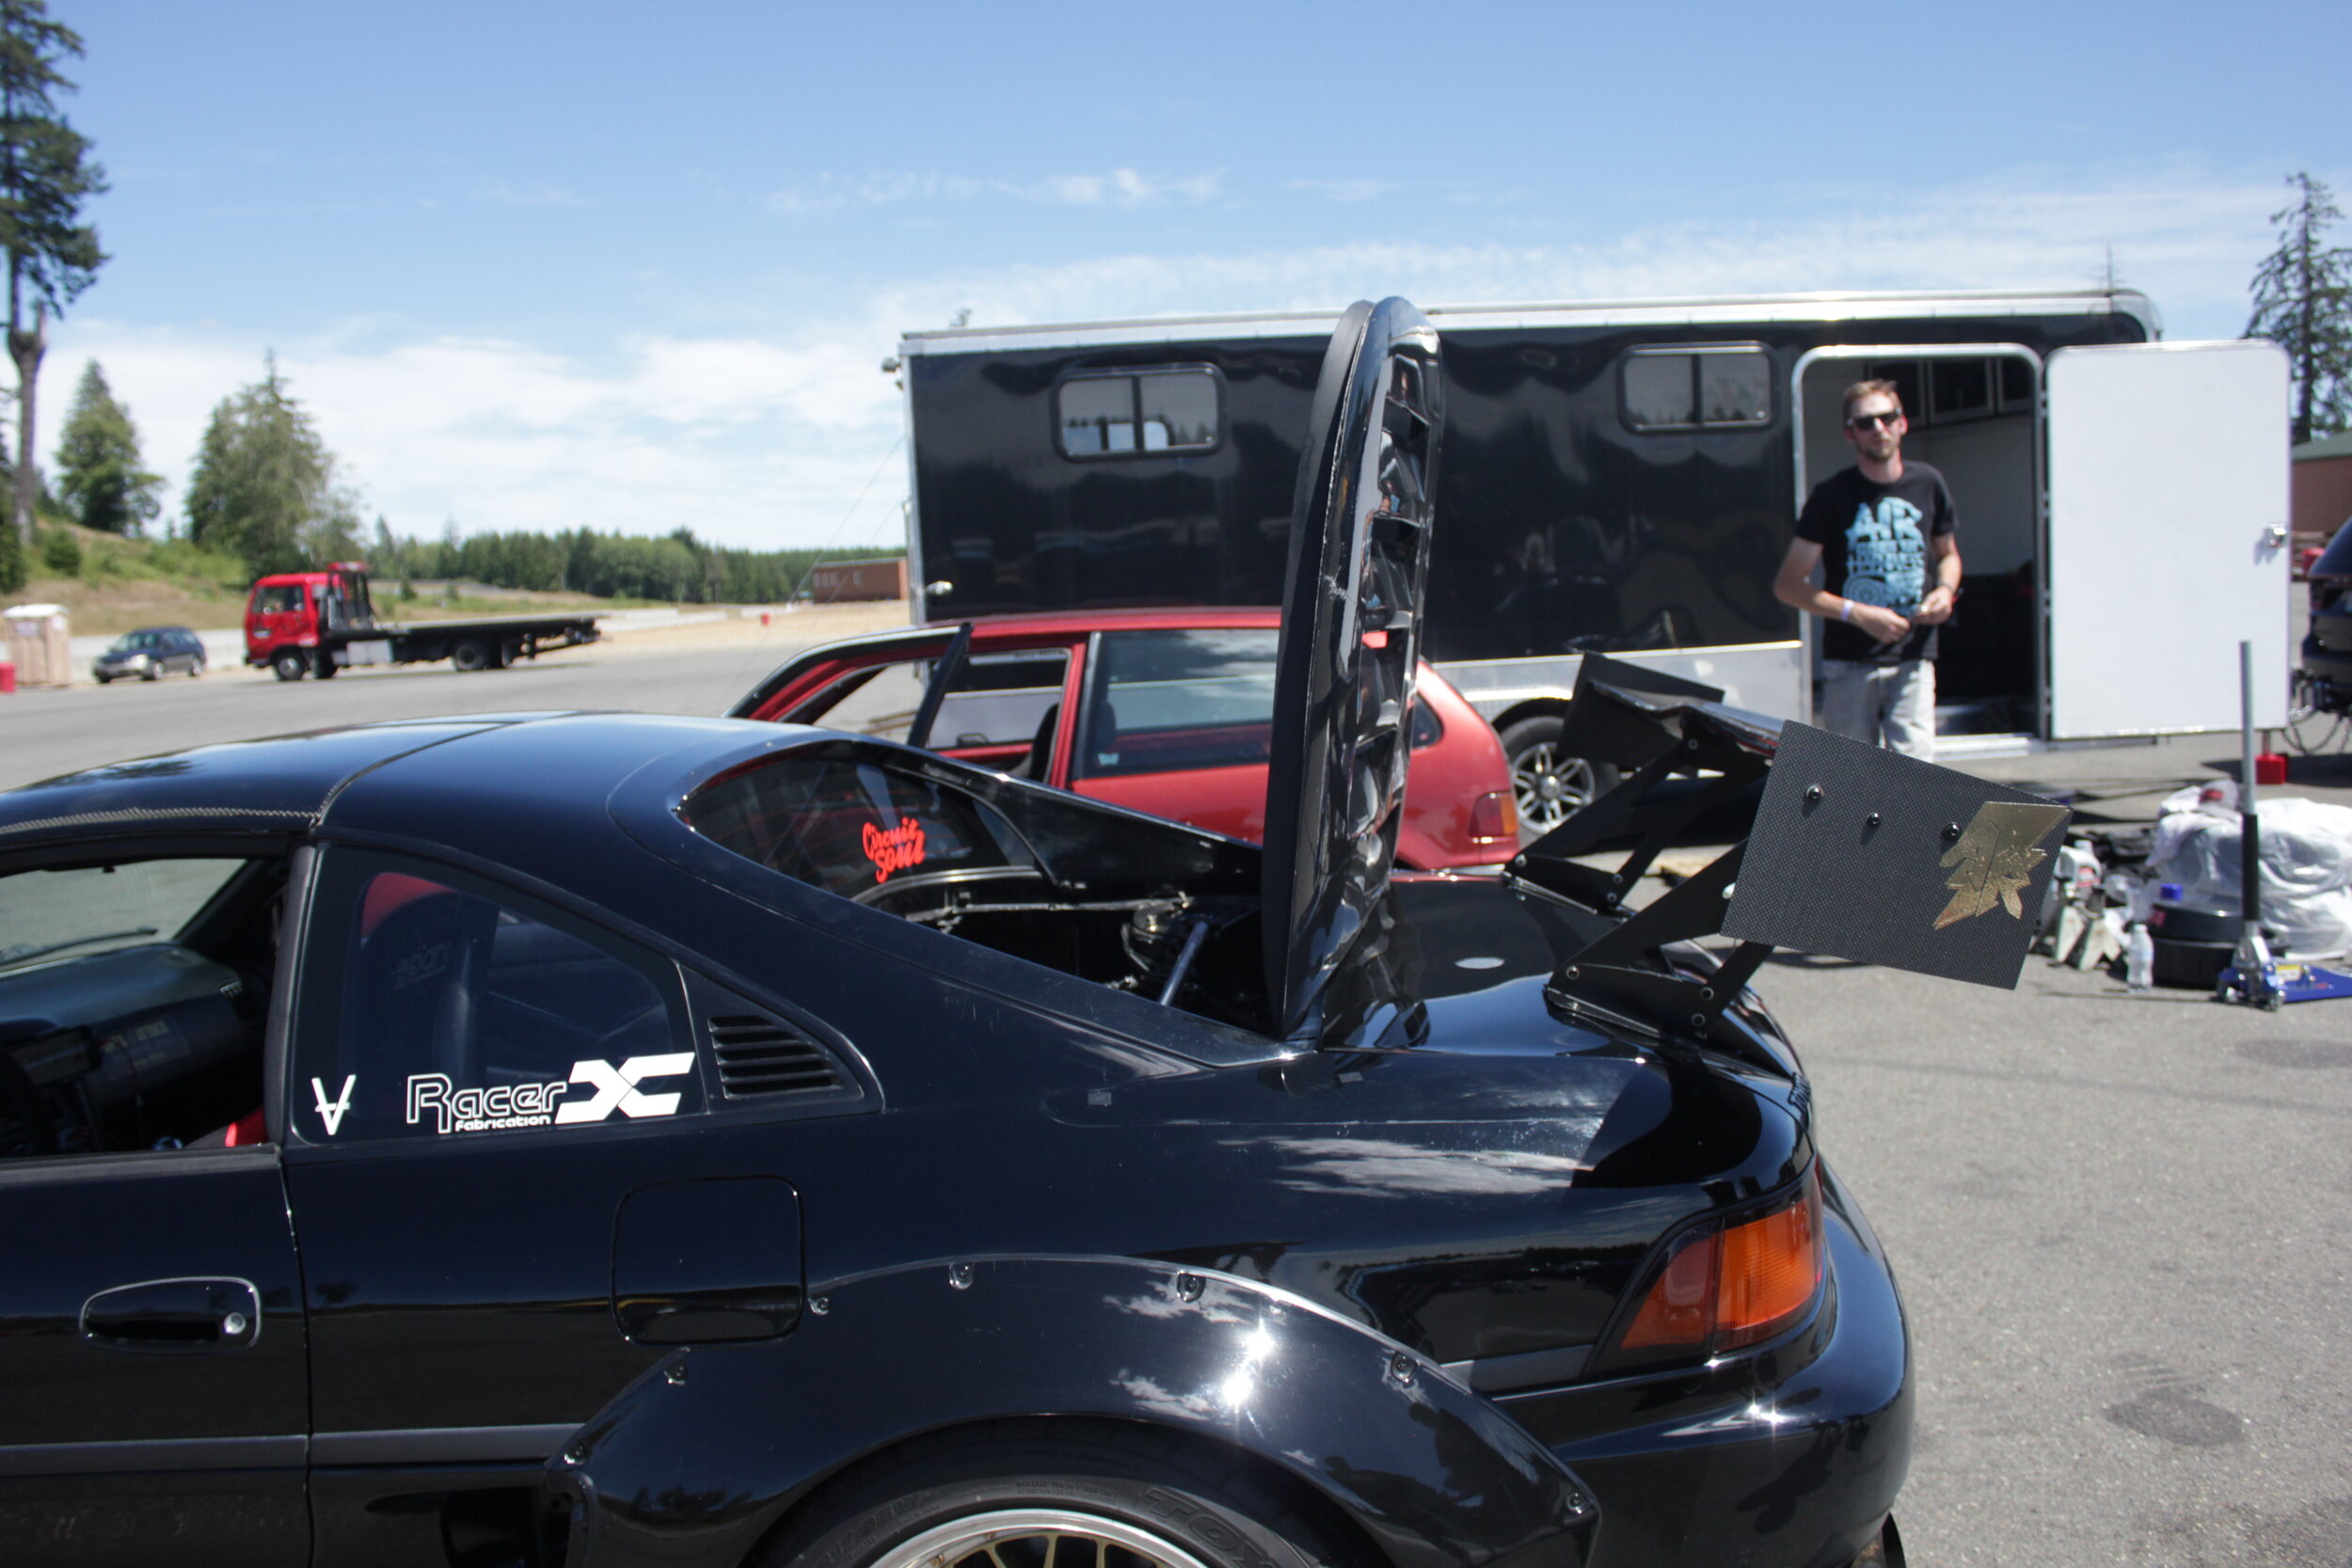
This pic is from the year prior, but the damage was the same. My fix of adding a much larger inner lip on the inside fo the lid had backfired… Oddly enough it happened at about 100mph… when my speeds were above 130mph on other parts of the track.
Needless to say, I didn’t trust my car at 125+mph and no rear wing. I decided to call it a day.
Then, literally to add breakdown to broken aero… while leaving the track I pulled out into traffic and all of a sudden I couldn’t get into any gear. My clutch was non operable. I pulled over and checked the slave movement, which looked fine. I proceeded to limp the car home through awful traffic by money shifting. It was the most stressful drive home yet in this car, but, I made it home a few hours later.

A few days later, I started to get the transmission out and see what the heck failed on me.

Since this was brand new transmission oil, and jugs of it don’t grow on trees, I did my best to save what I could. I filtered it through a coffee filter incase my clutchless shifting on the way home caused some premature wear and tear.

Once I got the transmission off (really only took about 2 hours, thanks MaxJax!) it was immediately apparent what had failed. See that spring… not supposed to be there.

Every spring housing had cracked. I’m probably lucky it didn’t pop out on the flywheel side and ruin that.
SPEAKING of FLYWHEEL… I do have a couple of theories on why it failed.
Back when I got the 2gr swap running and wanted to get it out for a test drive, I bled the clutch about 100 times before giving up. I still couldn’t get the car in gear. I came to the realization that the green coating on the Fidanza flywheel needed to be cleaned off BEFORE install. The coating is there to protect the flywheel friction surface from oil and dirt embedding into it. When Fidanza first did this they claimed it would wear off with use, no big deal. They have since changed their tone and now have a pretty obvious note with the flywheel saying to remove the green coating with acetone before install. My flywheel must have been old stock, because I didn’t have that note. So… in reality my clutch was properly bled..but was stuck to the flywheel and wouldn’t disengage. My solution to this was to start the car in 5th gear (with the rear wheels in the air), rev it up a bit, push in the clutch pedal, and pull the E-brake. Whaddya know, it worked!
Over the first week of driving the car with the fresh swap, sometimes it would stick when sitting overnight. I would start it in 1st gear with the clutch engaged and it would unstick itself.
Possibly…. these shocks to the clutch unsticking might have started cracking the spring housings. The only other theory I have is… what I thought was a pretty fancy stage 3 clutch… wasn’t (I honestly don’t remember what I got… it was given to me free when I bought my old Gen3). And the 2gr torque just tore it apart.
I’m not sure which caused the failure, or if both did… but my clutch now needed to be replaced.

I had the engine still in the car when I realized putting the trans back on perfectly was going to be a huge PITA. So, I pulled the engine too…again. It honestly only required disconnecting the harness, one motor mount, and the coolant lines. It literally took another half hour to have the engine out.

While it was out… I had couple things to attend to. One was the 2gr motor mount. Marc at Frankenstein Motorworks is a great guy and amazing vendor for the MR2 community. He basically pioneered the 2gr swap, and makes some great products to help the community. He also will answer any and every email and FB message to help you get your swap running. He reached out to me and offered to sell me one of his new generation motor mounts for a deal I couldn’t pass up. He actually sent me the prototype one after he test fit it… so I was pumped to get it. It’s a much prettier piece than my older two-part mount, and install was basically the same.

Remember my sticky flywheel theory? Might have some merit. The green coating I thought would be long gone after about 500 miles and a track day was still there. It even hot spotted the fly wheel a little bit. Obviously I hit that sucker with a BUNCH of acetone.

So, when researching a new clutch I had a few options. I reached out to Clutchmasters and they agreed to come on board the Apex Attack love train as a sponsor. Thanks Kevin at Clutchmasters! I picked up one of their FX500 clutches for the car. No springs means they can’t fail, right?
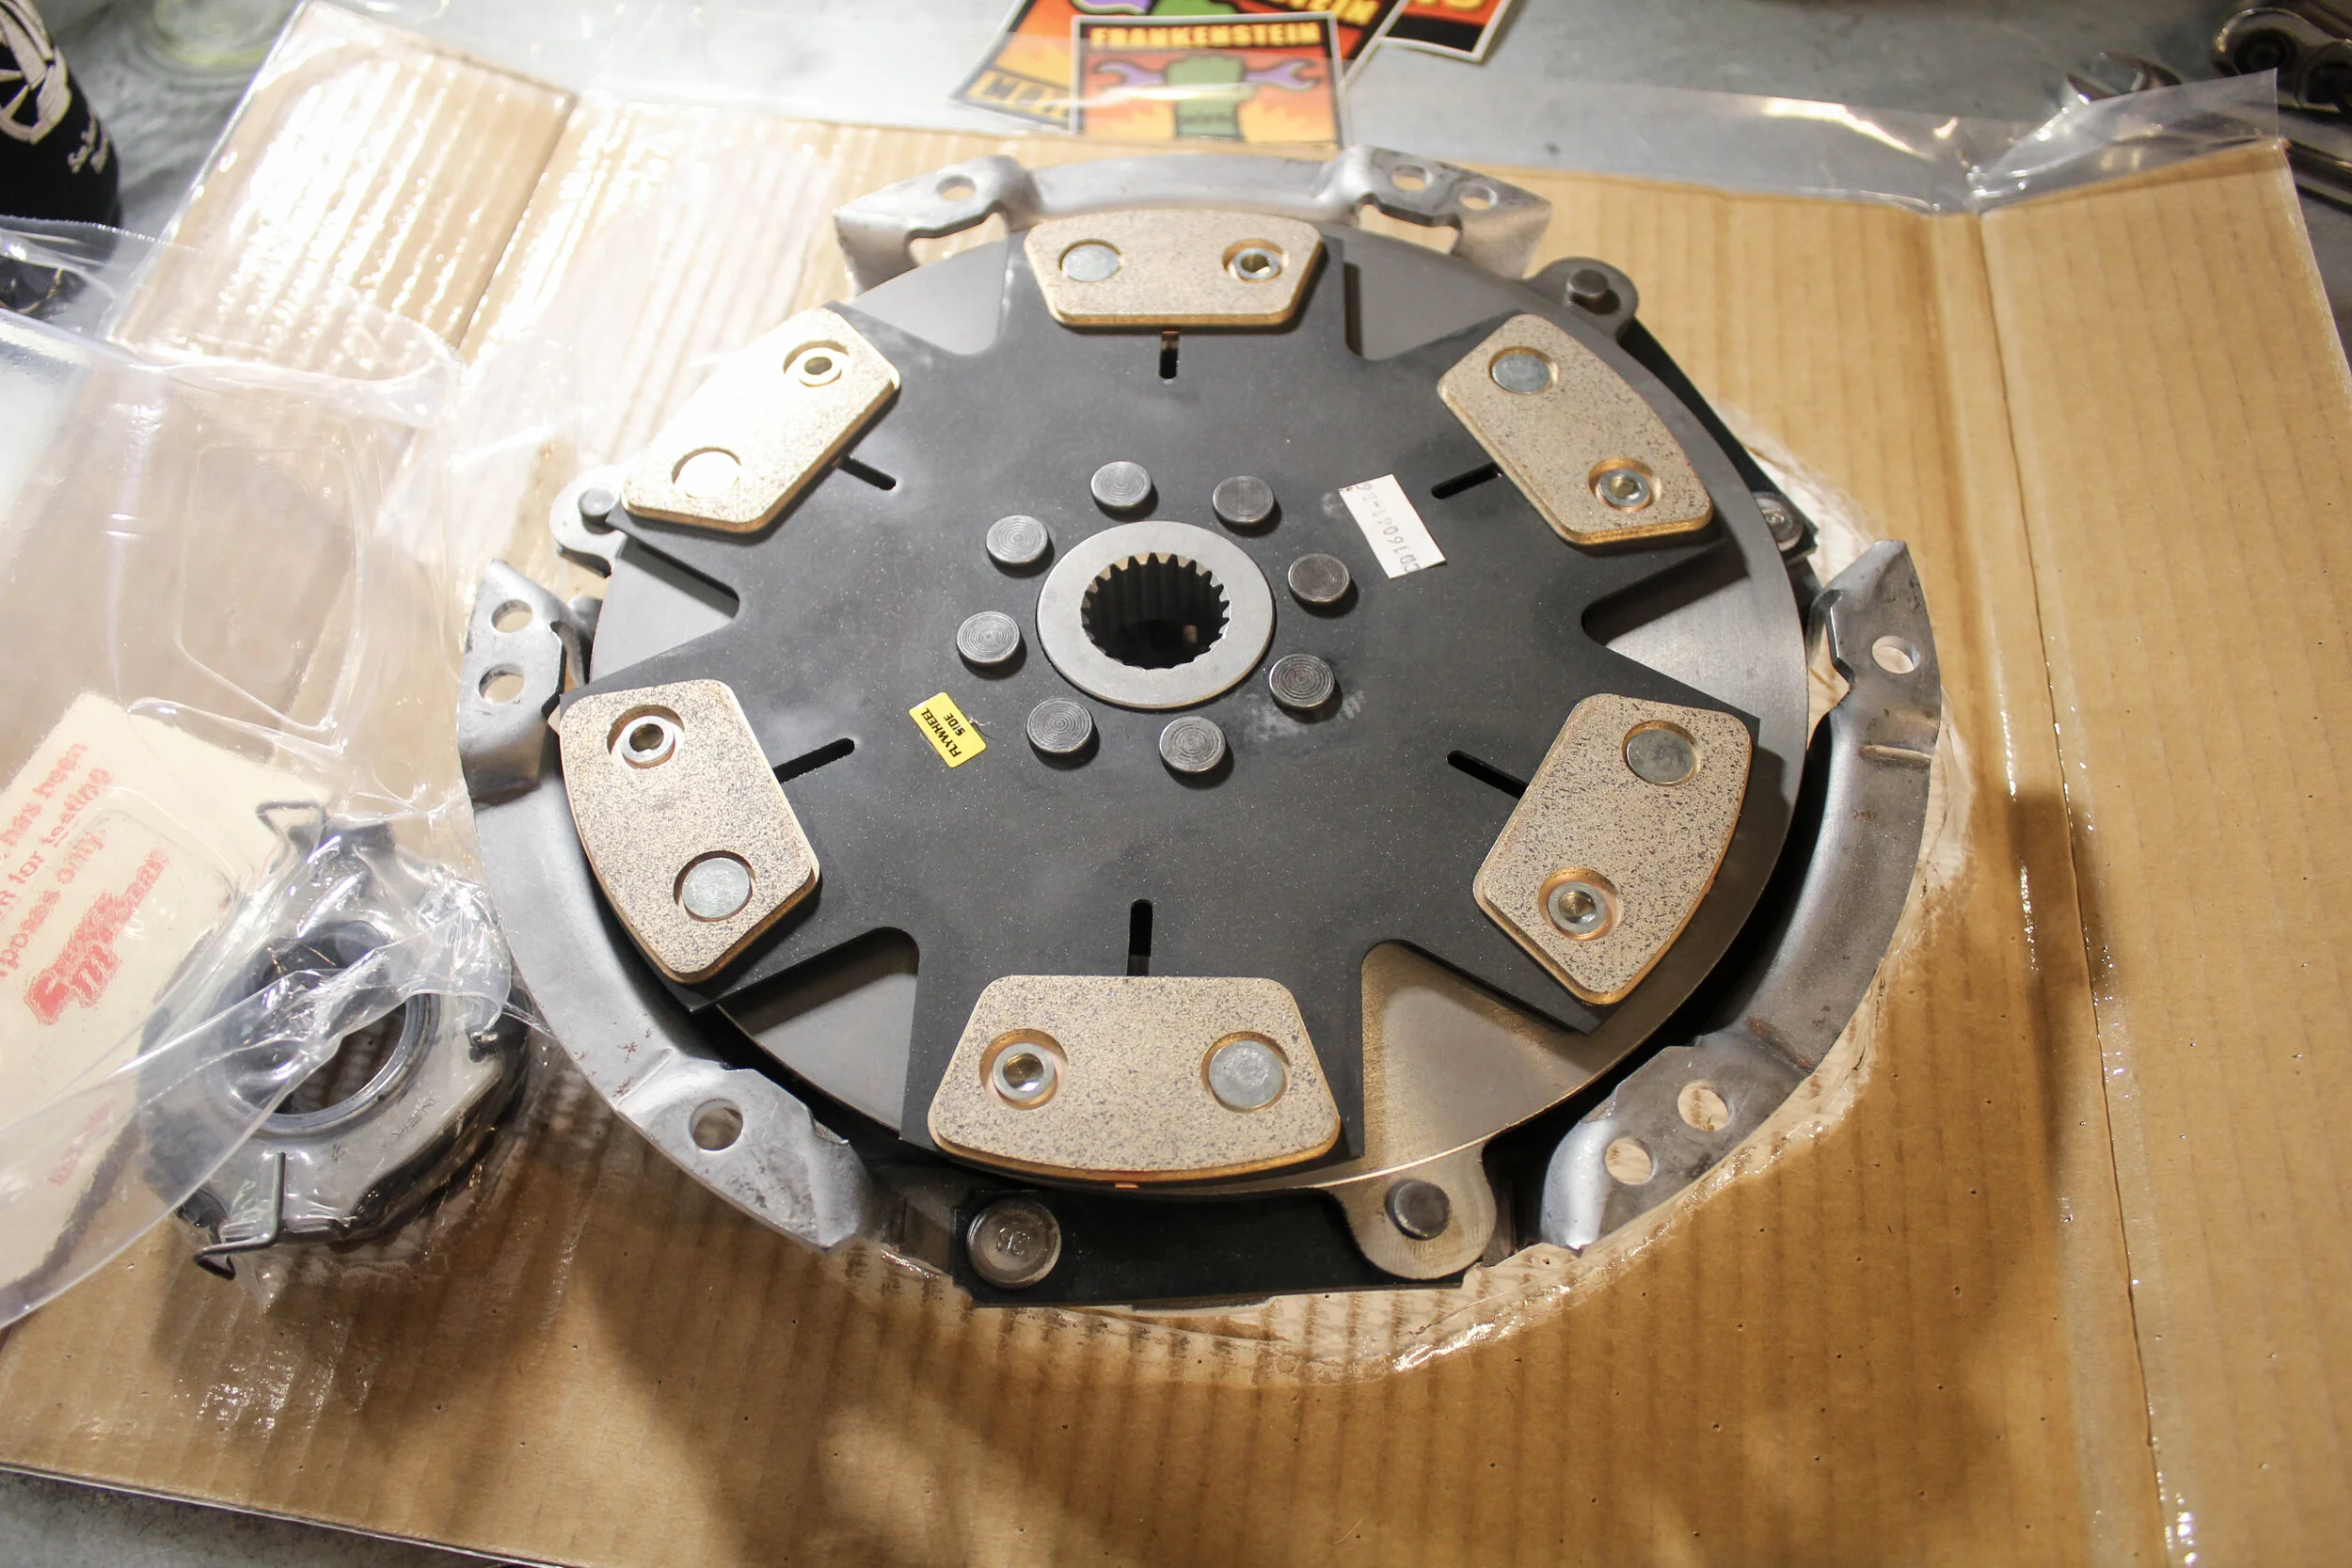
Looks like a nice piece of clutch, and came with a heavy duty pressure plate as well. Rated for 500hp… hopefully that’s true!

The new clutch on, centered, and torqued to spec.

With the engine on the cart, getting the trans on is a much easier affair.

Motor ready to go back in… again.

And, in! Re-install took about 3 hours. I’m getting too good at this…
Now, we still needed to turn our attention to the body parts I blew up (again).
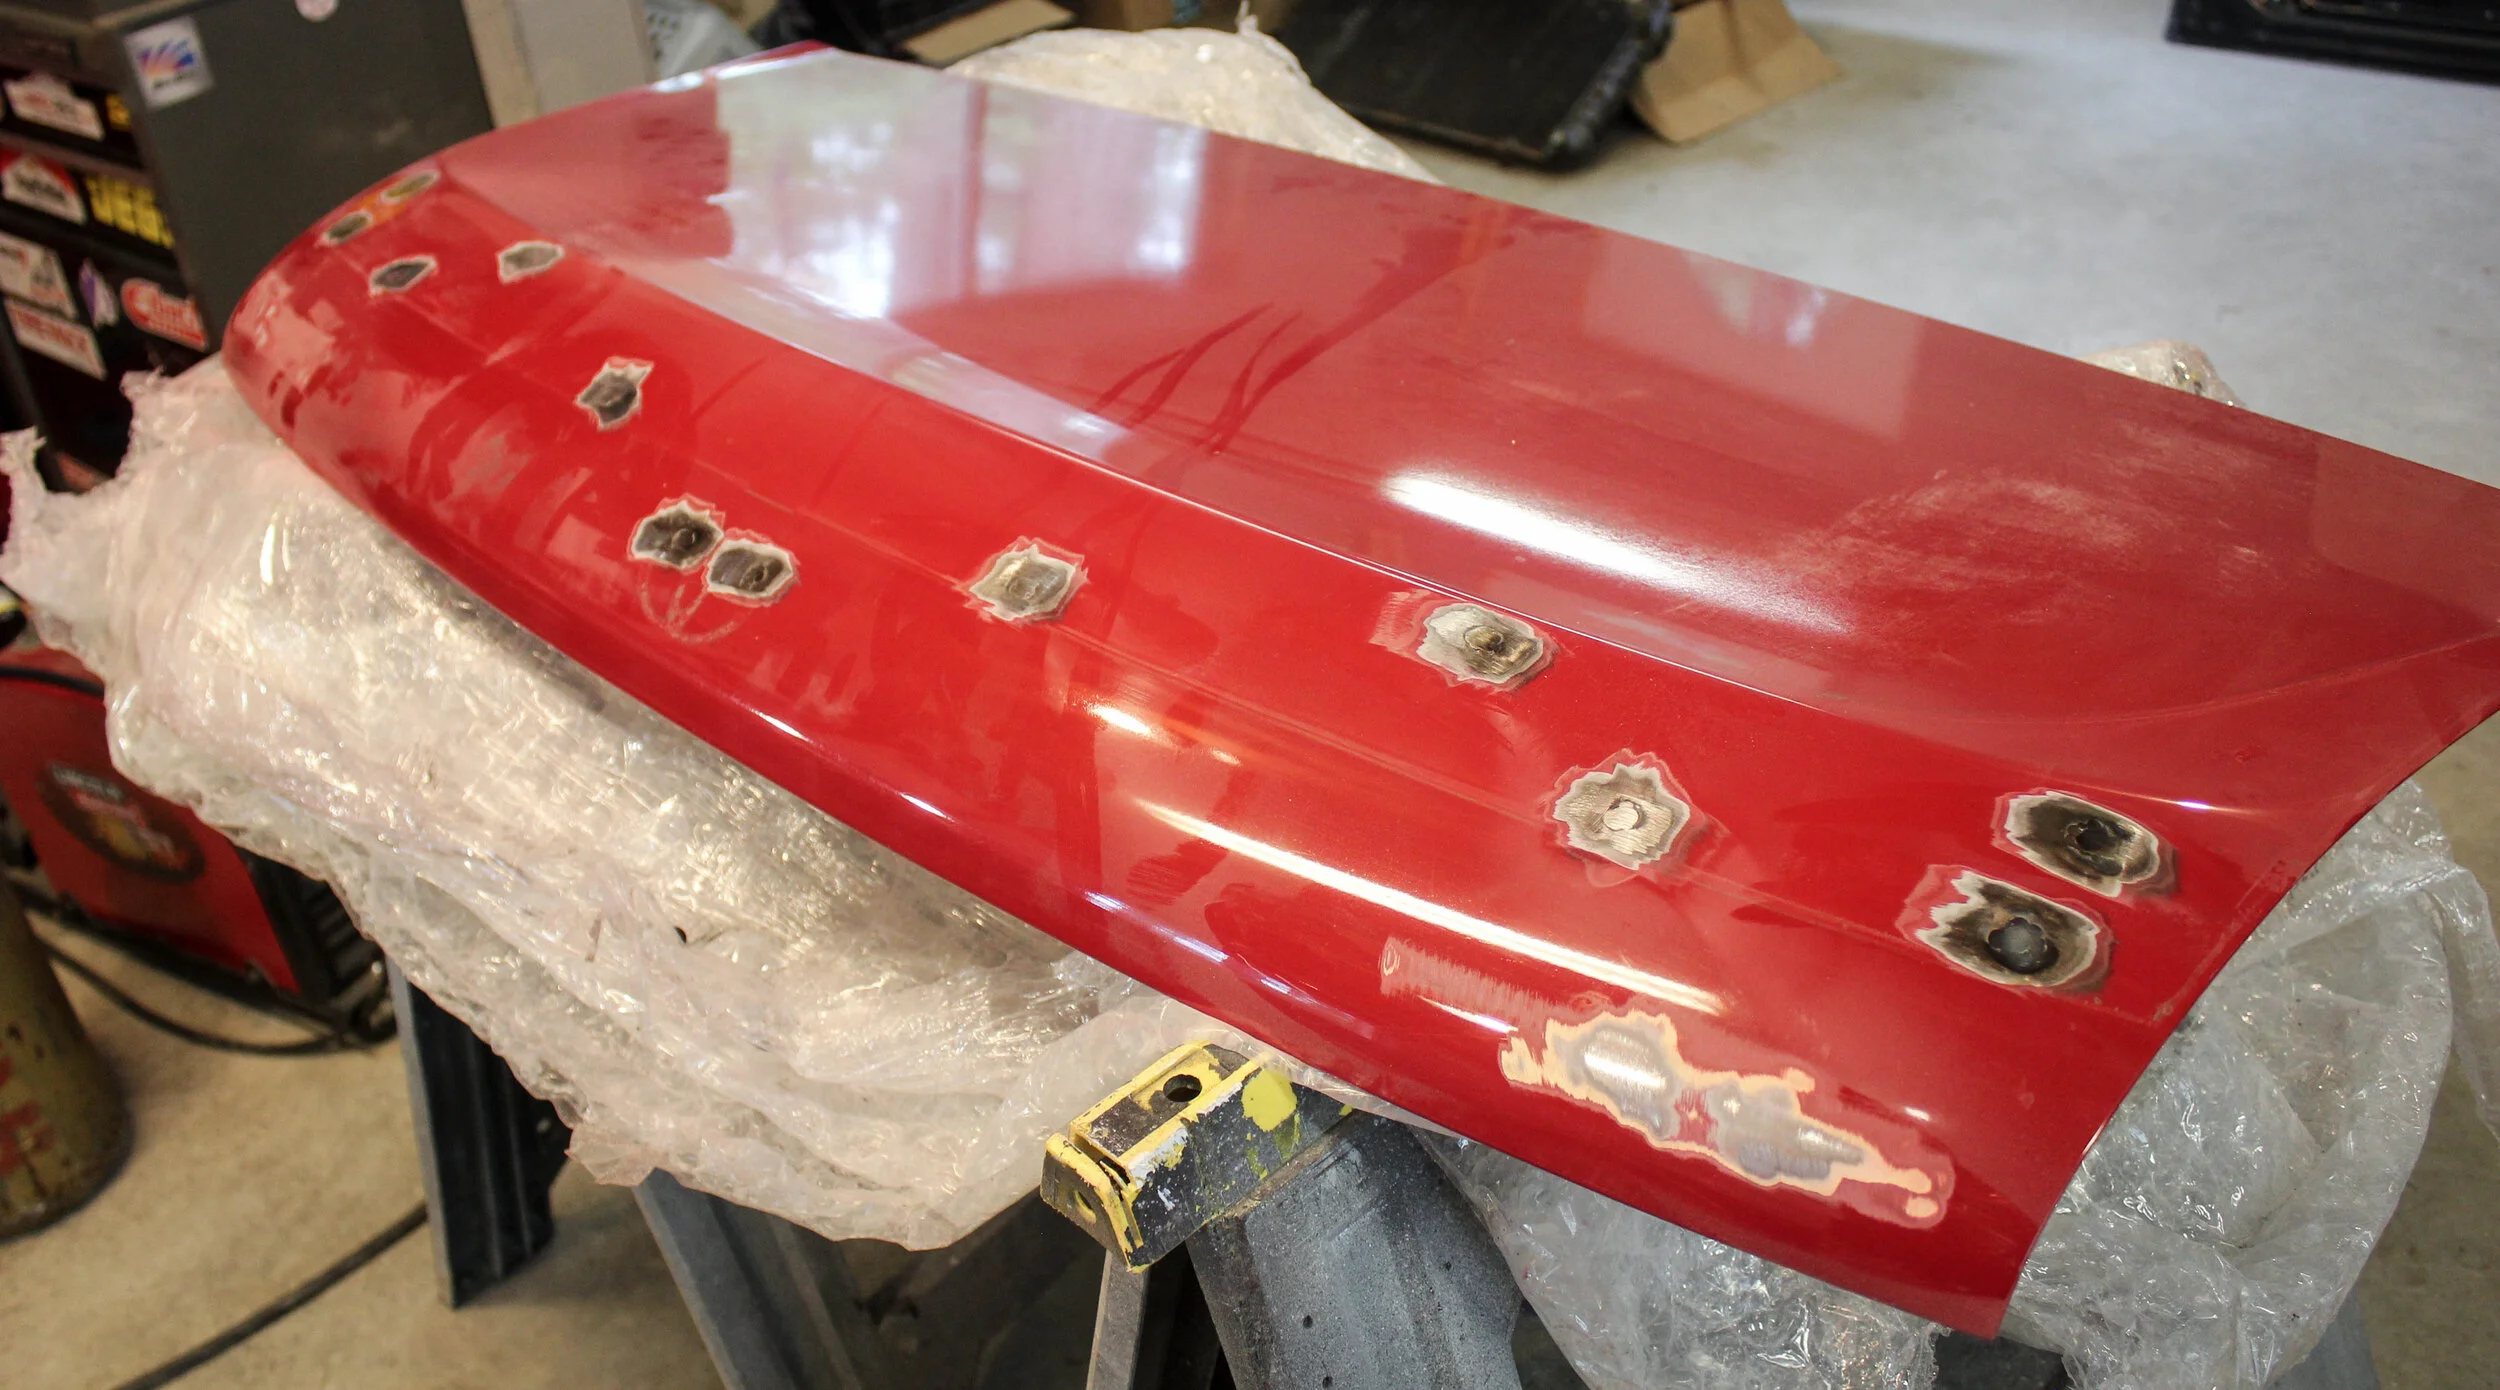
My F40 lid was cracked… again. So, I did what any pissed off guy would do at the track, I gave it to another MR2 owner there so I didn’t have to take it home (I had no room to get it home anyways). Luckily for me, Camposites had hooked me up with a spare about a year ago when my first one failed. He stands behind his products! If you don’t track your car, the lid is perfectly safe for most use. But since my car sees a lot of time above 125mph now.. I needed to fix this…for good.

My new lid is fiberglas, but it’s actually lighter than my old carbon fiber one, who woulda thought.

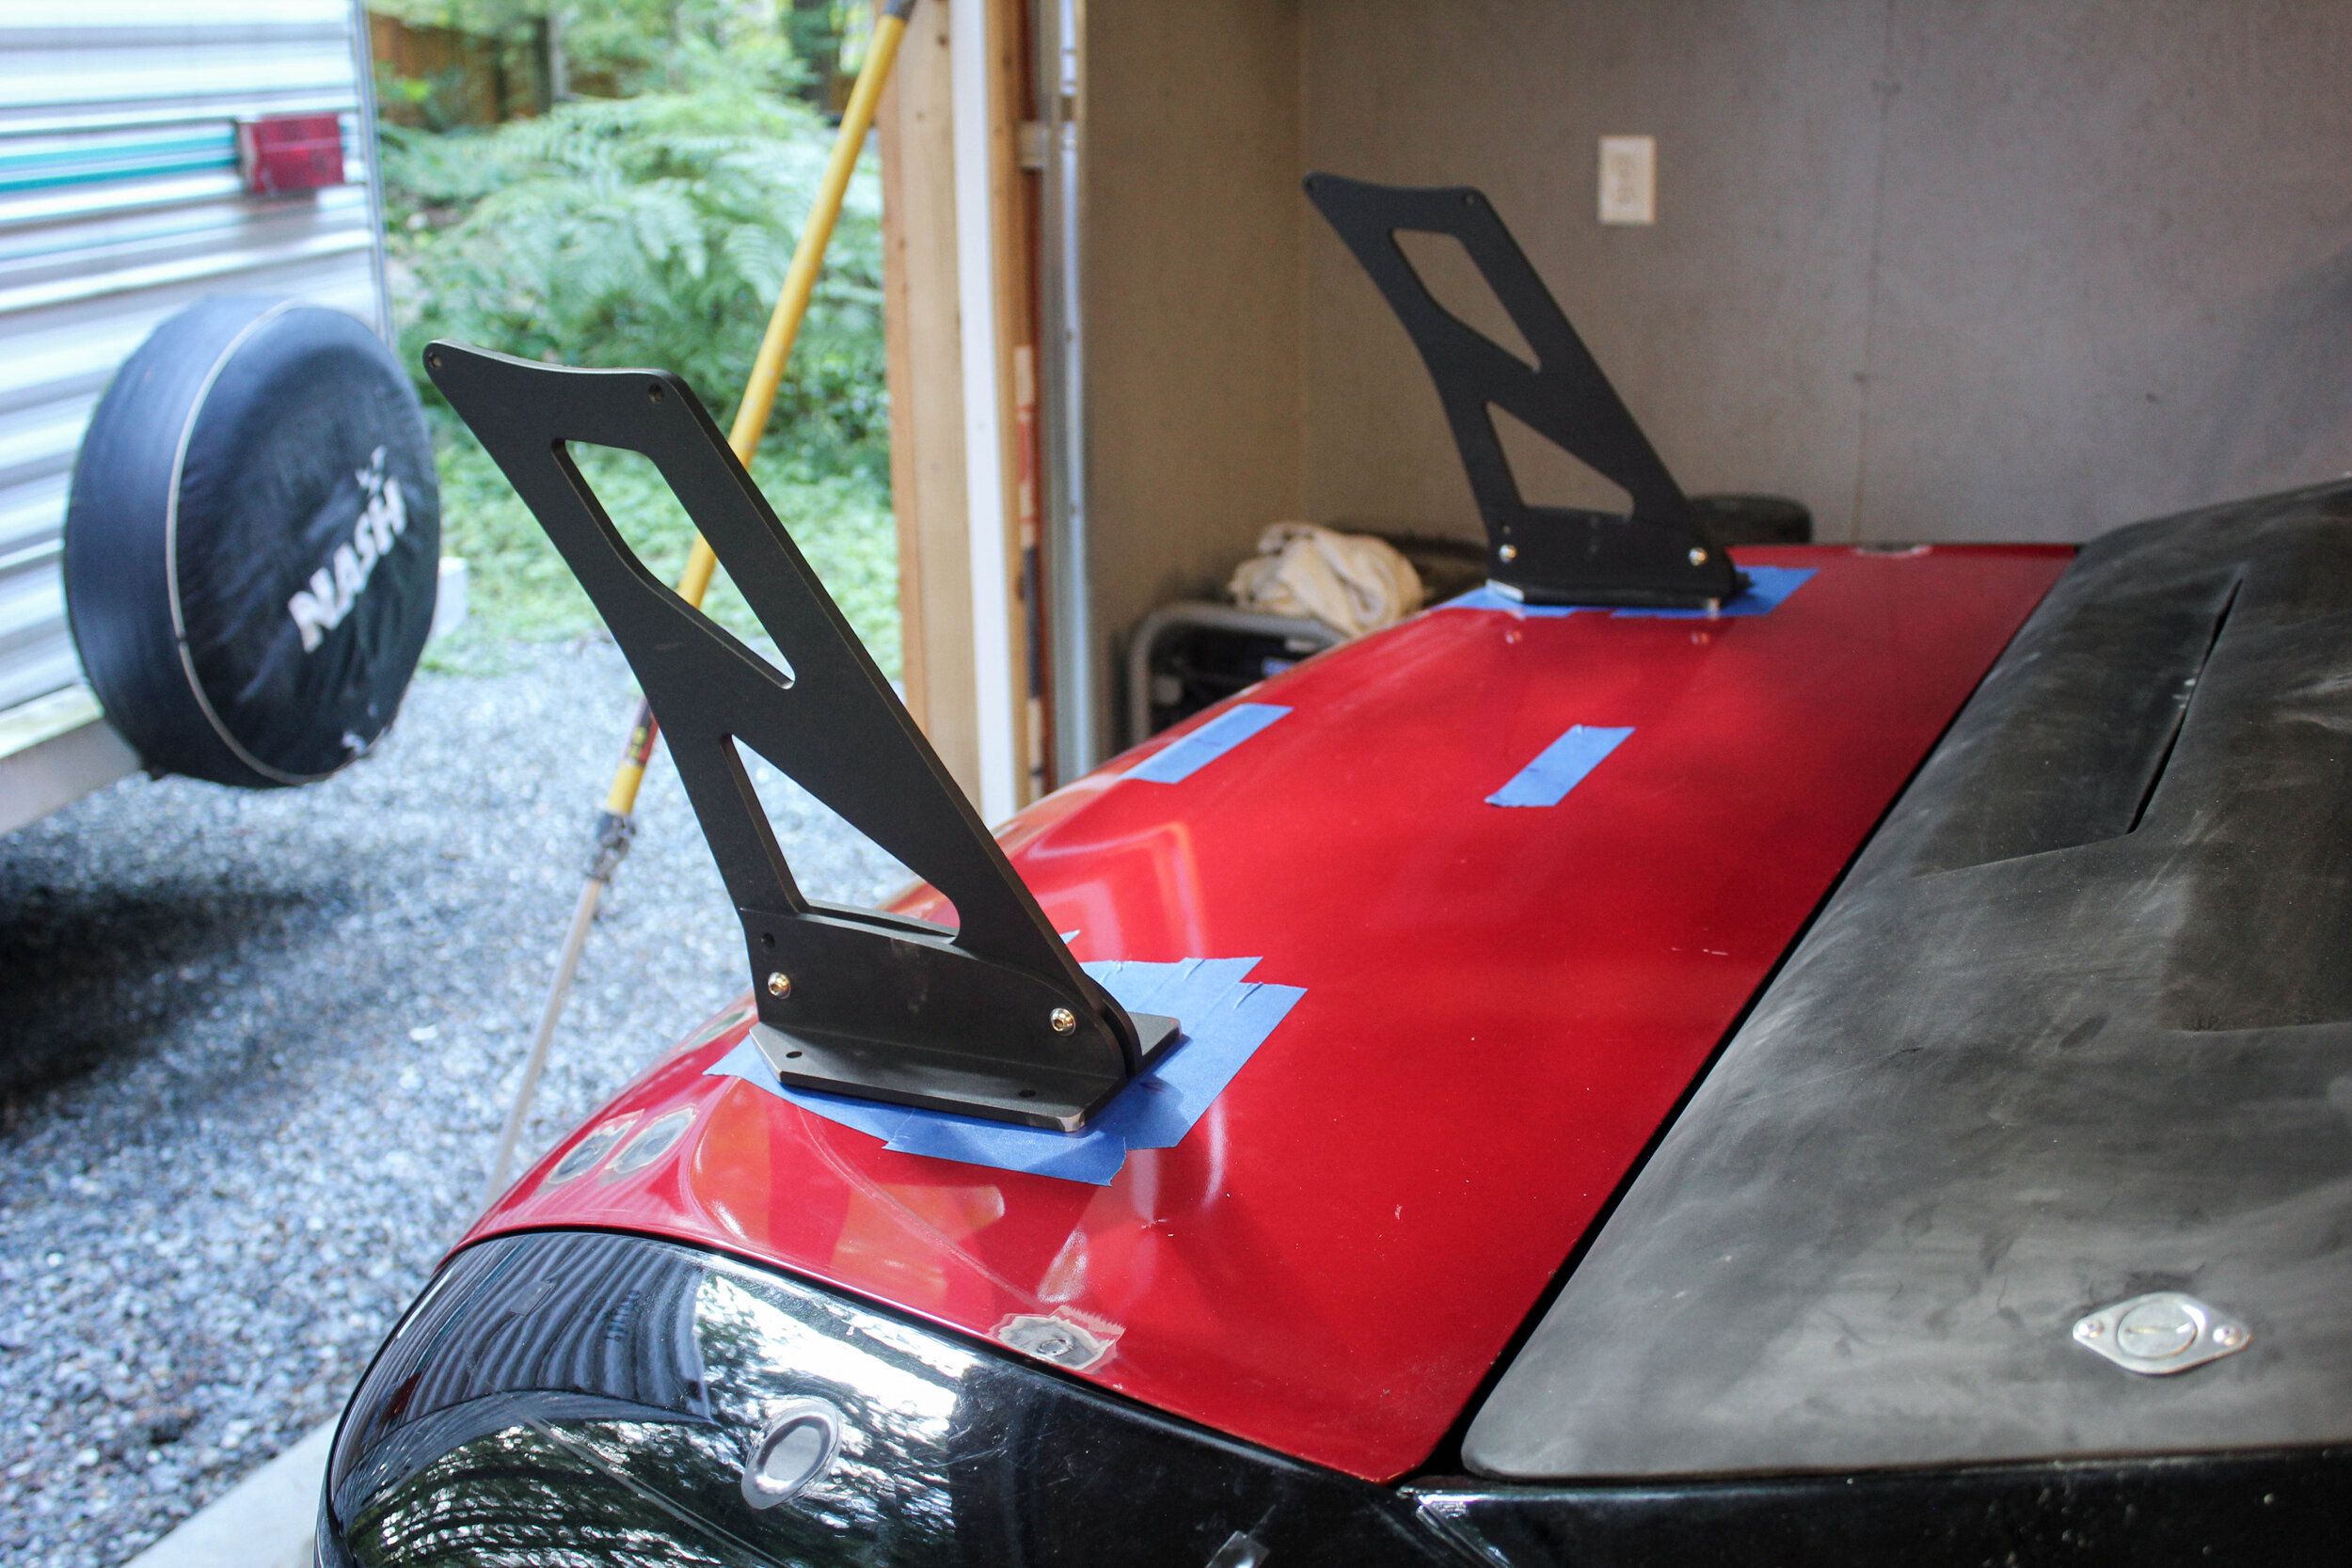
We’re ditching the OEM latch here, and going with a racers tried and tested solution, twist lock hood pins. Used forever by pro and amateur race teams, they work well, and are very affordable ($40 for a 10-pack from Jegs). I installed them into the rear window trim piece, but don’t worry, the screws I’m using actually go all the way through the pinch welds underneath the rear moulding.

I figured locking down the 4 corners was the best for it. In case of an engine fire I admit it’ll be more difficult to access the bay, but I’m really sick of blowing up rear wings, trunks, and engine lids.

With the underside catches installed, we needed to notch out the lid to fit.

F40 lid inner lip has been notched out, and I tweaked the catches so they were as close to the lid as possible.

No big deal, drilling big holes in a brand new $400 engine lid.

This is the underside with the twist pin installed and the spring loosely installed to show how it works. You put the lid on, and twist each pin 90 degrees and the pin catches the spring and locks into place. We will install the springs with rivets, along with the twist pins to the engine lid.

Here’s a blury picture of the lid with the pins installed. Hopefully you get the idea. Simple, cheap, and reliable. I pulled on the so hard I could hear the fiberglas flexing and epoxy cracking a little bit, and it didn’t move at all. The engine lid would literally have to snap in two now to fail on me. (*knocks on wood while writing that last sentence)
Luckily, a very friendly Canadian had no room to keep his spare trunk lid, and offered it to me when he saw my plight. (Thanks Marc!). It obviously had all the spoiler holes in it so those had to be welded up.
Measure 100 times, drill once.
Then we had to brace the underside of the trunklid. If you don’t, the wing will flex and buckle your trunk in very short time. I wanted to be more thorough this time around, so I went with some angle and cut it to fit the trunk bracing.


This is the mockup, I then welded the angle to the bracing. After that, I cleaned, scuffed, and painted the underside of the trunklid.

While the paint dried I got to work putting together my new wing. With these cheap NRG wings, make sure you tap the threaded holes for the endplates… or you’ll cross thread the bolt and really screw yourself.

Time to give the welded holes a little bit of filler, and prep the rest of the trunklid.

After a few coats of epoxy primer… we were looking good to put everything back together. I also laid some epoxy primer on the F40 lid to clean it up. Epoxy primer does a great job of sealing everything up on the panels you spray, but doesn’t fill imperfections like high build primer.
With the car back together, it was time to break in that new clutch!


50 Shades of Black.

GAWDDAMN the 2gr sounds good. My new clutch was grabbing WAY too high on the pedal travel, hence the terrible clutch slipping. I adjusted it after this drive and it’s not much better.
Since the car was now running again, of course we had to sign up for another track day! That update coming soon! (or late)