
Lotus Vent Install
The car was running!
But without coolant.
Why no coolant? Well, my OEM turbo radiator had developed a very slow but noticeable leak over the last year or so. So, I partnered up with Mishimoto for a fancy new radiator.

Thank Mishimoto! While the radiator fit great in the OEM spot… you know I needed to make things much more complicated than that.
If you follow the IG (@apex.attack), last winter I posted a picture with a really cool idea I wanted to try out.

That’s right, a first gen Lotus Elise hood vent grafted onto a MR2 hood. Our amazing MR2 buddy Campos is making them. (https://www.camposites.com/product/lotus-elise-lotus-exige-s1-vented-hood-insert)
No, I’m not the original idea man behind this madness, but the legendary John Toh is. His Malaysian super widebody MR2 has been running the Lotus vent a few years now, and it looks fantastic.

(Courtesy of Speedhunters: http://www.speedhunters.com/2018/06/modifying-mr2-the-malay-way/)
I reached out to John, and he’s very friendly and helped me out with some pics of his install. Unfortunately, his isn’t functional. I definitely wanted mine to be functional. John also cut up a steel hood. I was going to slice and dice a carbon hood. So I still had to figure out quite a bit.
Remember I used to have the Border style carbon hood? Well, once I realized Campos was making these Lotus style vents, I put mine up for trade for an OEM style one and lucky enough, someone local wanted to swap. My “new” hood is a Seibon, and not in great shape. The clear coat was refinished once, and the clear cracked heavily all over it while drying… so I will eventually try to refinish the hood or just paint it all black like the old one.
With a very rough plan in my head, we started taking the front end apart in the shop. First to go, the old radiator, and front bumper.

Pulling the splitter, bumper, and radiator took a bit of time… but not too bad since I hadn’t installed my new fenders yet.


The old radiator had seen better days. It was actually rebuilt at sometime in its life… had a sticker from a radiator shop in Colorado on it (the car spent most of its’ glory days in Colorado before arriving on my operating table). The small leak appeared to be from the endtank, a hairline crack somewhere.

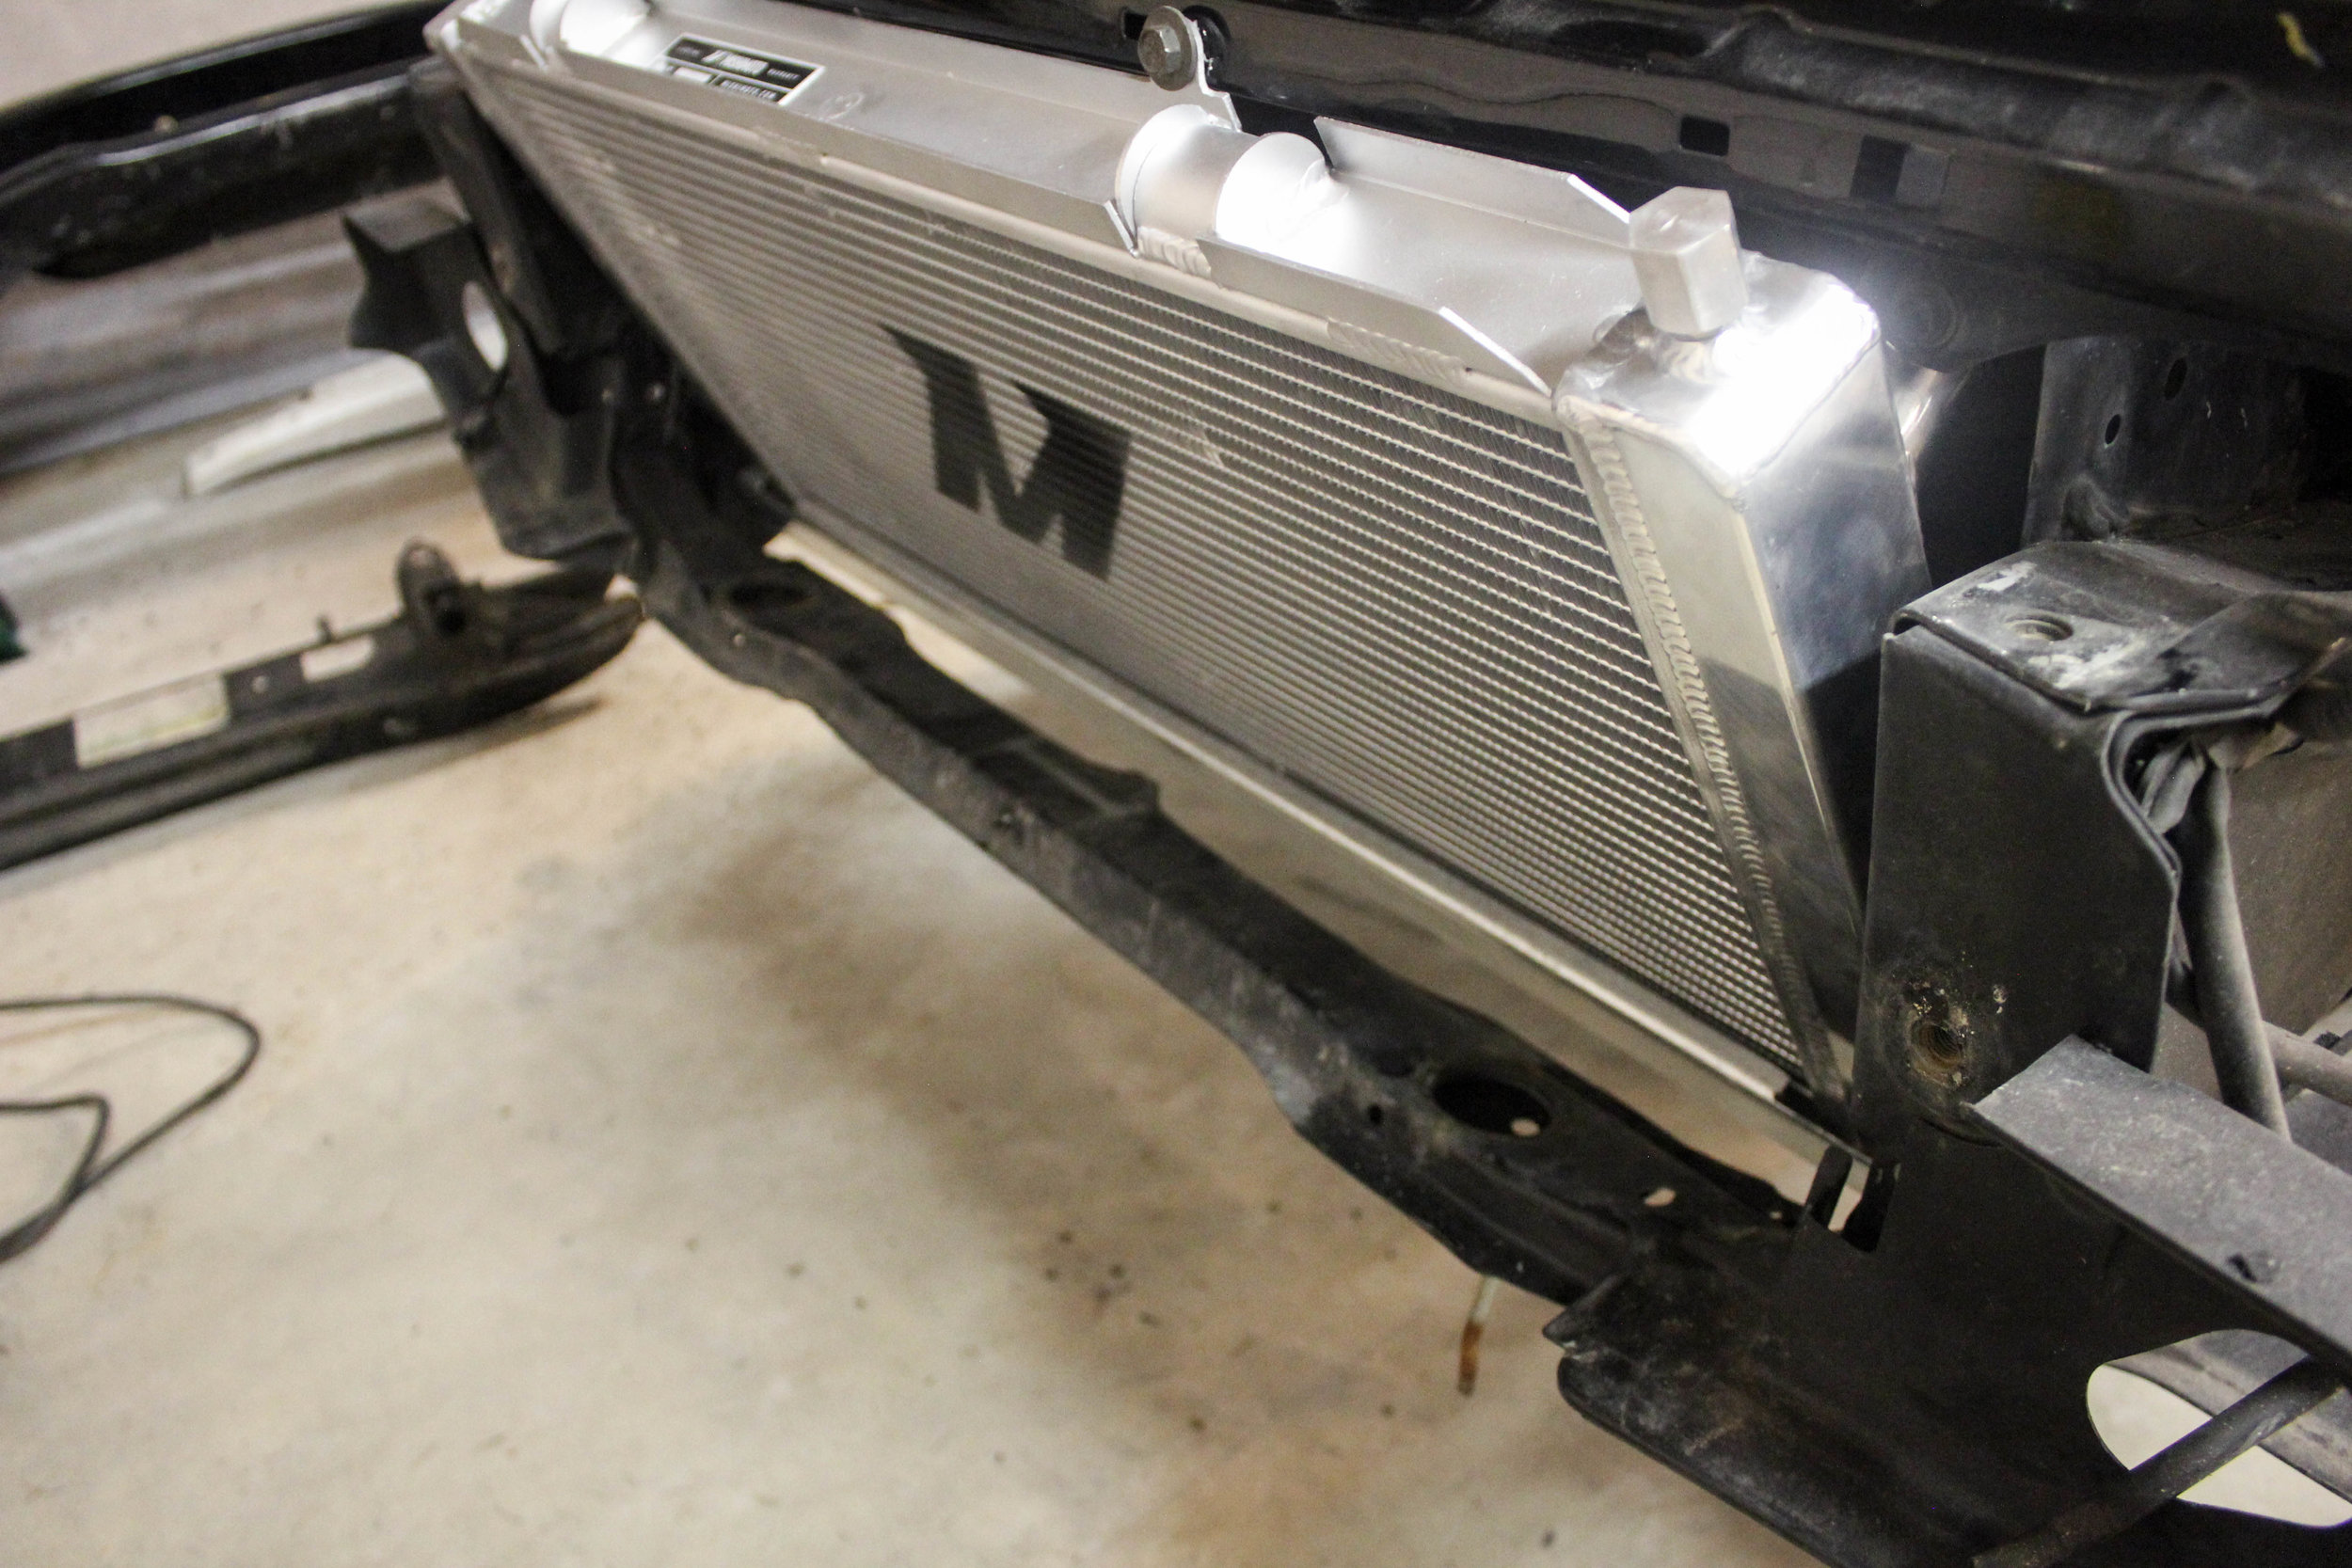
Late night and bad lighting in the front of my new shop make the photos pretty bleached out. With the front end dismantled, we could start figuring out the radiator placement. If you didn’t know, the OEM radiator placement is pretty bad for aerodynamics. Air forced through the radiator is forced down and out underneath the car. The radiator is actually leaning back in its’ OEM location. We want to lean it forward as much as possible.
After a bit of head scratching, leaning the radiator forward in front of the bumper support piece seemed to fit almost perfectly.
With a very rough idea of radiator placement, I got to work the next day on the fun part, destroying a carbon fiber hood!

I started to get an idea of how I wanted the lotus vent to fit on the hood. You will need to trim parts of the vent to really fit the MR2 hood. Although when finished it’s really not noticeable.

Once I knew my placement, I taped up the hood so I could mark my cuts. I placed the vent on upsidedown and traced the outer part of the vent.

I measured in about 1-1/4” from the outside trace line and made a second smaller outline of the vent, this would be our cut line. DON’T CUT THE OUTER LINE!
Fire up the air compressor and load a cutting disc onto your grinder, it’s time to crack a few eggs to make an omlette.

Too late now, we’re committed. (Note: wear a damn mask when cutting carbon fiber/fiberglas, your lungs will thank you)

Once you cut out the top, you need to cut away quite a bit of the hood skeleton underneath. Take your time here, it can be hard to see exactly where you need to cut and how deep. The worst would be slicing through the hood in the wrong spot that would be visible after the vent is installed. Also, the hood will become very floppy, so take care flipping it and handling it, it would suck to snap it in half, and is possible. When we glue the lotus vent in it will gain back a lot of its rigidity.

Ta-da! We got a big ol’ hole in the hood!

On the actual vent campos has replicated, it has a lip on the mounting surface. Although you could mount it this way, you would have a lot more surface area to mount the vent if you shaved the lip down flush. So, that’s what I did. Unfortunately, I forgot a pic, but a flapper wheel on a grinder wheel made quick dust of it. (WEAR A MASK, srsly)

I then mixed up a bunch of panel bond and globbed it on. Since the hood lost a bunch of rigidity, I needed some random weight to hold the vent and hood together while the panel bond cured. Paint cans worked great. The seam between the vent and hood is still pretty rough, but that can be easily cleaned up with some automotive caulking once the hood is refinished.
While the panel bond cured I focused my attention onto mounting the radiator. The simplest way to lean the radiator forward is to tip the top of it forward of the bumper support bar, and pull the bottom of the radiator back and fabricate a new bottom mount. I figured some c channel would work great to hold the radiator well… then a lightbulb went off. A metal stud is almost the perfect width, its steel (so I can tack weld to it easily), and overall still very light.

Trimming the steel stud in strategic places and adding holes for the bottom tabs to sit in, it looked like it’ll hold onto the radiator very well, and still have room to shrink and grow with heat cycles. The top tabs will mount to the front of the bumper support via some nut-certs.

You can see the top mounting tabs in the pics here.


On the bottom mount I tack welded some longer tabs to the steel stud and mounted those to the original radiator bottom support. I wanted to keep the OEM support in place as that’s where some of the splitter mounts attach to.

Since we had moved the radiator significantly, we needed new hoses. So, I made a simple cardboard template of the hose connections I needed and took a trip to my local NAPA. The guys there let me wander through their entire hose section to see if I could find something to work. As luck would have it, the store had a hose almost perfect for my application. NAPA hose #8303 is a great fit with a little trimming. The bend does create a air bubble trap, but it was by far the best fitting hose I could find. With enough revs the water pump should push the air out of those bends.

Once I was happy with the new bottom mount, I gave it a lick of paint to protect it from the weather.

Unfortunately the OEM fans weren’t gonna fit my new location. While very reliable, they’re just too thick with the shrouds, and very heavy. Amazon came to the rescue with two cheap 10” fans. They mount via zip ties through the radiator and I spliced on the OEM connectors so they’re essentially plug and play. They seem to provide quite a bit of air flow. If they crap out on me in a few years, they’re easily replaceable. Did I mention they’re pretty light?

With the radiator in place and hood in place, we were getting close. But one more big part of the mod still to do. Vent the radiator through the hood! The whole point of the mod, connect the two big dots. This would require lots of cutting and fabrication of a vent piece. You can also see through the vent that my master cylinder brace is visible. Unfortunately this will have to be closed off to the vent as I want to keep using it.

The cut portion marked out as big as I can make it. Time for more slicing and dicing of my once very clean 93 turbo.
I cut the hole and got to work building the vent. I was in the zone and didn’t take many pictures of this process, or at all. But, you probably already know my process here. Make cardboard templates, copy to sheet metal (I had some galvanized steel sheeting from work, not as light as aluminum, but free), assemble using some 1/2” x 1/2” angle aluminum and lots of rivets.

Overall, I’ll admit it’s pretty crude, and could definitely be refined and perfected. I felt like I was in a bit of a rush with an impending track day on the schedule, and I think my work shows. But, we can always rebuild it better now that I’ve learned a lot.

The vent is mounted to the chassis via nut certs in 5 spots.

Here it is, mostly finished. One of the main drawbacks of this setup will be access to the radiator to bleed the coolant. With the bumper on, it’s inaccessible. So, we’ll have to bleed the coolant with the bumper off.
After the initial build, I came back and built a small cover for the master cylinder brace. It’s built to be sloped into the vent. This way if it rains while the car is parked, water “shouldn’t” get into the frunk area. I did pull the plug in the frunk so water can drain if it needs to.

I also used a piece of angle to help flex the duct to match the curve of the Lotus vent better. It’s definitely not perfect, but it helps match the airflow.
Eventually I‘ll paint the duct so it’s a little more hidden and protect it from the weather a bit better.


With the car now running, and the front hood vent for the most part, “done”, I rushed to get the car ready and put some test miles on it for a track day that was rapidly approaching. Here’s a test run. The sound, is amazing. The car pulls hard, at least as fast as my gen3 was in a straightline. The torque is instant. Overall I’m very happy with the new engine.

Here’s a teaser pic of the new setup in the pits. I know I forgot to talk about the super fancy new fenders… more on that next time! And a track day! How will the new setup fair against my old turbo 3sgte? Find out soon!